During the Halloween days, it is so common for us to find a wreath hung on the door or fence. You can easily find many wreaths in various design that looks spooky and of course eye catchy. The wreath is like a must-have thing to complement your Haloween decor.
Sure, you can just buy a Halloween wreath in the market, but the design is mostly too common and doesn’t suit your taste and it may also cost you a lot,A�so making one on your own would be a very great idea. It isn’t hard actually to make a DIY Halloween wreath as hundreds of tempting tutorials are widely available on the internet.
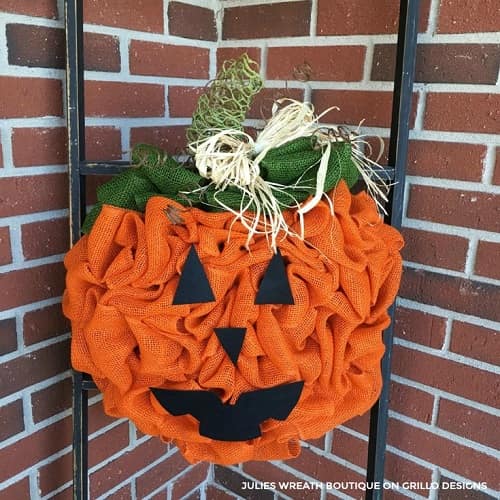
here, we share you an interesting DIY Pumpkin Wreath TutorialA�created by Julie’s Wreath Boutique on grillo-designs.com. The wreath is made of some burlap sacks which are coupled together. It’s very fun to make and doesn’t really take lots of elbow grease.
The cost that you have to spend also doesn’t really that much, but the result is mesmerizingly beautiful. So, let’s just keep scrolling to check out the complete tutorial of thisA�DIY Pumpkin Wreath!
(Check this out:A�DIY Witches Brooms Tutorial)
DIY Pumpkin WreathA�Tutorial
Things that you’ll need to prepare:
- 20 yards of 6-inch orange burlap ribbon
- 10 yards of 6-inch green burlap ribbon
- 12-inch and 8-inch wire wreath frame
- Green and orange chenilleA�stem
- Natual raffia ribbon
- Brown rustic wire
- Green Chicken wire ribbon
- 4-inch and 8-inch Zip Ties
Tools that you’ll need to prepare:
- Scissors
- Wire cutters
Making the wreath:A�
- Make a crossbar in the center of the 8-inch wreath frame by using the 2 orange chenille stems.
- Combine the wreaths into one frame by using the 8-inch zip ties. Put the wreath in the proper line-up, then tie the zip on each line.
- Now start to use the burlap, there’ll be two divided section on how you’ll attach the burlap, the 8-inch wreath frame and the half part of the 12-inch frameA�is for the orange one, and the other half of the 12-inch frame for the green.
- Weave the orange chenille steam through the orange burlap for around three weaves, then attach the burlap the bottom of the wreath frame.
- Now start to make the loop until you reach the one side of the crossbar. Secure the loop with chenilleA�stem.
- Repeat the steps of making the loop, but right now do it vice versa from the center of the wreath to its edge. Secure the burlap once you reach the trim by using the stem.
- Continue to make the loop and leave about 1/4 area of the 12-inch wreath frame for the green burlap. Remember to always secure the loop by twisting the chenilleA�stem.
- Cover the remaining of the wreath frame with the green burlap, make the loop just like you make the orange burlap loop. Don’t forget to use the green chenille stem to match the look.
(Recommended for you:A�DIY BW Pumpkin Topiary Tutorial)
Making the pumpkin stem:
- Start rolling the chicken wire ribbon in a straight way for about 3 rolls, and start to at an angle then make the bottom upper part of the roll smaller than the bottom just like the shape of pumpkin stem.
- After you get your desired stem size, then cut the wire by using the wire cutter.
- Smash the wire a little bit then bent it until you get a perfect stem shape.
- Flatten the bottom part of the stem, then attach it to the back of the wreath frame by using zip ties.
Making the grapevine accent:
- Make some curly shapes of the rustic wire.
- You can wrap the wire around your finger due to your desired size, then cut it when you’re done.
- Attach the brown wire into the wreath frame secure it with the zip ties.
Making the raffia bow:
- Take a group of raffia, and make a ribbon shape by making some loops.
- Secure the ribbon by using the beige stem or zip tie.
- Attach the ribbon to the chicken wire stem.
You may need to cover the back of the wreath frame with circular felt and make a hanger by using the stem. Then, if you want to make the pumpkin look much spookier, you can draw the Jack O’ lantern face by using the black felt then stick it onto the top of the wreath.
(Read also:A�DIY Hanging Witch Hats Tutorial)
Now you can hang the DIY Pumpkin Wreath on your door, or porch pole for your ultimate DIY Halloween decor!
Have fun to do your project and happy Halloween day!


