Getting the heated floor in your bathroom is every homeowner’s dream. When you wake up in the morning and come into your gorgeous bathroom, you would find a new enticing atmosphere. It will make your bathroom become a precious place in your home.
Installing the heated floor in your bathroom is indeed an excellent idea for you. How come? The floor heating delivers the warmth and coziness to your bathroom. This kind of floor is really appropriate in the winter. You will enjoy the bathing on the warm floor after working all day pleasurably.
In fact, many people think deeply to decide in installing the floor heating. The heated floors in bathroom use huge electricity which is costly, and also can be dangerous. For those reasons, most of the homeowners are getting dilemma to have the heated floor in their bathroom.
Perhaps, by knowing about the floor heating further, you can think better about this feature. To help people in deciding the project, we share some things that you must know. Here, we share you the definition of floor heating, pros and cons, the tips in installing, and also DIY.
The Definition of Floor Heating
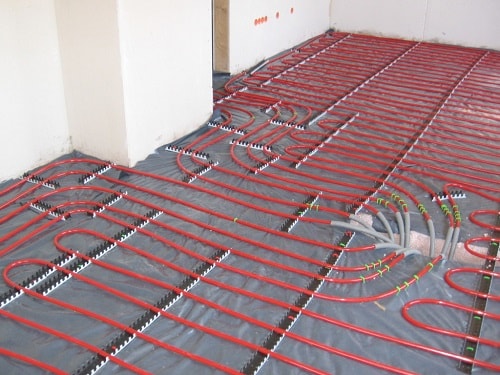
The floor heating has two running systems including hydronic system and electric system in which both of systems work to heat the floor. The systems use the fluid flowing in pipes and electrical resistance element in conducting the heat.
The electric system is constructed of the wires mat to be able to install in different types of flooring. While the hydronic system uses the single energy source to manage the energy costs. The sources include electricity, wood biomass, biofuels, coal, oil and natural gas.
Pros and Cons in Installing the Floor Heating
Pros
- The heating system produces a smooth heat to your bathroom floor.
- The type of heating floor becomes a great choice for your bathroom because it will work along with the tile.
- The floor heating systems have many types that you can choose as your provided budget. Certainly, you can take the cheap or the expensive one.
Cons
- Floor heating systems potentially make the floor or tiles getting the risk of damage.
- Installing the floor heating mat needs some required assembly. In addition, laying down the insulation board and pouring the concrete are exactly needed on the heated floors in bathroom fixing.
- Applying the floor heating spends much money to install. It is caused by spending the high cost in buying the components and required hardware.
The Tips You Can Do in Installation the Floor Heating
To get the best result in installing heated floors in bathroom, it is better to read some references before. Here, we share you some tips that you can do before you install the floor heating.
-
Educate Yourself
If you eager to install the floor heating by yourself, certainly, you can learn many references. By watching the video or looking the professional installer work will help you in this project.
-
Find a Qualified Installer
For this tip, if you feel that you can’t do it well, finding the experienced professional installer is a good idea. Of course, the qualified installers will know which the components can work well.
-
Use the Contractor Services
Of course, the best result of floor heating involves the good communication and coordination in a teamwork. The contractors actually can work together to get the best solutions. In addition, they can estimate the work as soon as possible. Therefore, you do not need to spend much money.
-
Prepare the Right Controls
To get the energy efficiency and optimal comfort, a control system is needed. You must prepare the required components such as operating temperature and room temperature. Before you have it, you are better to cancel the project.
DIY: Installing the Heated Floors in Bathroom
The Tools You Will Need:
- Electric Floor Heating Mat
- Insulation Board
- Screws
- Cable
- Compound (Concrete Mixture)
- Trowel
The Steps You Must Do:
Step 1 – Preparing the Base Floor
Before you decide to make heated floors in the bathroom, firstly, you have to prepare the base floor. If you do not prepare the base floor yet, actually, you have to build one. Using the compound and concrete mixture, you are totally able to create the base floor well. Just plastering it well, it purposes to make the surface flat and level.
Step 2 – Putting the Insulation Boards
For this step, you are putting the insulation boards down. Make sure that you apply the board in the correct fitting. You have to put the board on the whole floor in directly opposite positions. If you find a board that does not fit the floor, you can cut the boards to suit.
Step 3 – Sealing the Insulation Board
If you have applied the board, the next step is you must seal all the joints using a standard plaster scrim tape to get them united. Now, you can see all of the scrim tapers down.
Step 4 – Screwing the Boards
Before we install the wire mat, we exactly must screw the board to make it applied to the floor. You can put about 15 screws on a board as the manufacturer recommendations. After all of the screws are down, it is better to wash the board using the Delta board washer. The goal is to make the board nicely flat and secured. So, it is not going to damage the under floor heating.
Step 5 – Marking Out the Fittings
This step is to mark out where the fittings are going to go. Actually, the bathroom provides the toilet, sink, and vanity so that we must fit the floor space well.
(Read also: DIY: Replacing Bathroom Light Fixture with Easy and Simple Steps)
Step 6 – Measuring the Floor
Now, we’re going to lay the heating mat over up the board. A few key rules that you need to know when laying the heating mat is a cable position. That is a rule number one that the cable cannot be touched by people.
In addition, the easiest way to lay the mat is just doing a bit of planning. For installing the mat, actually, you should measure the floor to match with the boards so as the fitting right.
Step 7 – Fixing the Electric Floor Heating Mat
It can be mentioned as the main step where you must install the main material in it. We can totally start in a place where the electric controller exists. Starting from the edge of the wall to the other. Furthermore, for cutting the mat, you can use the scissors or a Stanley knife but you need to be really careful in doing this. Then, return it round and you roll it back.
After you’ve done fixing the mat, you need to create a channel under floor heating or in the subfloor so as the cable sits flat.
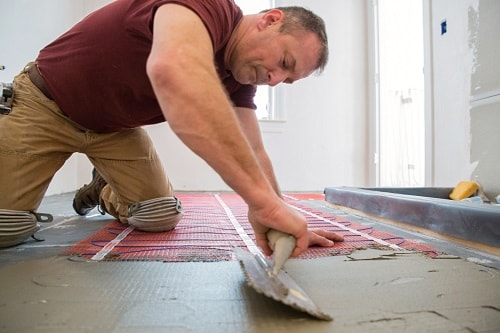
Step 8 – Leveling the Compound / Concrete
The last stage in fixing the mat is doing the leveling compound. For spreading it, you can use a plastic trowel for flatting the surface. Then, pour the compound onto the floor and spread it out. You should do the leveling compound evenly and gently to prevent the floor breaks or cracks. Then, you can lay the tiles on it without cable damage.
Those are some steps that you can do in installing heated floors in bathroom. Now, it is your turn to create it by yourself. For more details, we also show you a tutorial video to install heated floors in bathroom. Let’s check it out!