When the homeowners talk about the best earthy material for backyard’s fencing, cedar wood will come at the first place. For centuries, this beautiful and durable wood has been used to provide security, privacy, and beauty for millions of properties. There are no any doubts to choose cedar wood as your fencing option.
Comparing to other types of woods like redwood and pine, cedar has always become the most favorite choice. When redwood can be really expensive, then cedar comes as the solution. Yes, pine can be more affordable than cedar, but its lack of sturdiness becomes one minus point.
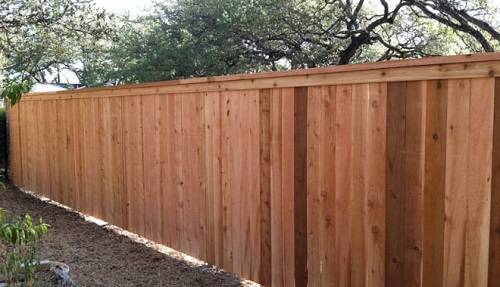
Choosing wood fence is never a bad idea since its versatility is so beneficial for the homeowners. Wood fence is a perfect match to enhance the natural surrounding of your outdoor living space. The natural durability of wood fence also guarantees that your backyard is safely protected for years.
With so many wood fencing design that you can choose nowadays, picking the one which provides privacy and safety at the same time is the best. Picket fence surely looks beautiful, but it works well only to decorate your garden. The high and solid wood fencing style provide peace of mind for you and your family.
DIY Cedar Fence
Here, we have a guide about how to build a cedar fence in your backyard which can be done by you and some help from family and friends. You can use this guide as the basic reference when you want to build your own cedar fence. Let’s check it out!
Cedar Fence Materials
- Cedar woods
- Cement mix
- Spray paint
- Stakes
- Galvanized nails
- Twin
- Chalk
- Gravels
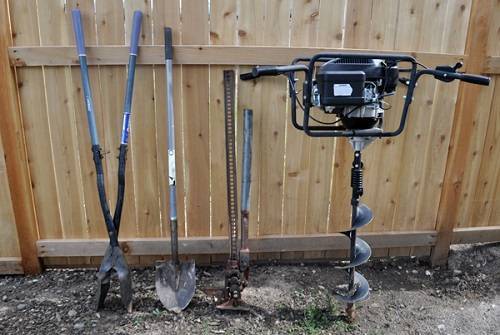
Cedar Fence Tools
- Measuring tape
- Fence post level
- Cement mixer
- Post hole digger
- Hammer
- Tabel saw
- Circular saw
- Power auger
- Shovel
- Chisel
- Finish nailer
Cedar Fence Projects
- Determine the location where you want to install the cedar fence, then measure the area. Mark the point for each fence posts with the spray paint. The proper space for the posts is not more than 6 feet.
- Dig the hole for the fence posts, and you have to check the regulations to know the proper depth that you can have. It is important to avoid damaging any buried structure.
- When the all the holes are set, start mixing the cement.
- Now, place the fence post in the hole and add the concrete into the hole. Mix the concrete with a shovel then add the gravels. You can fill the whole hole or leave a few inches to cover the hole with soil.
- Secure the post level when the concrete is thick enough to the post. Let it set overnight.
- Use a circular saw to cut the post as your desired height.
- Use the measuring tape to determine the height of the two outside fence posts. Stretch a line by a chalk from these spots across the other ones.
- Make the cuts on the fence post by using a circular saw, set the depth to the half the width of the fence post. Score throughout half of the fence post above the chalk line.
- Attach the fence rail by using the finish nailer and galvanized nails.
- When the rails are all set, start adding the boards. To keep them from rot, keep the boards 3/4″ off the ground. Nail the boards in using the framing liner. The table saw can be used to cut the last board to fill the place.
- When the board is set, you can attach the fence cap.