It’s absolutely most homeowners’ desire to have their own bathroom vanity. Setting the good-looking vanity in the bathroom is a must for some people, considering that the vanity has some functions to put your toiletries or bathroom accessories.
Hence, the vanity can be included into one of the most important stuff to have in your bathroom. Not only for practical use, it also absolutely enhances the look of the bathroom significantly.
Sometimes, some people prefer to buy the prefab bathroom vanity with hundreds of vanity products are available in some local market. Well, you won’t have to bother yourself to have a beautiful vanity to decorate your bathroom.
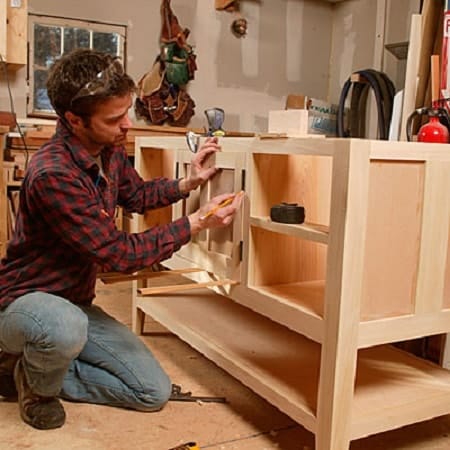
However, to make your own bathroom vanity is absolutely your dream, right? Indeed, the homemade vanity is more interesting than prefab one. How come? Because when you are planning to make your own bathroom vanity, you can design the one as you like.
Making a vanity is actually not a really hard job as most of you may assume. Today, there are hundreds of references to give you some guides to make the vanity easily.
(Check this out: Weathered Wood Bathroom Vanity)
Furthermore, many builders use timber to make a good quality vanity. Its texture enhances the character, warmth, and naturality of the furniture to style your bathroom.
Here, we give you 30 steps with easy instructions to make your own bathroom vanity. Make sure to read the guides out and follow our steps in your project. Good Luck!!!
DIY: How to Make Your Own Bathroom Vanity
| Tools | Materials | Safety Gears |
| Circular Saw | Timber | Goggles |
| Cordless Drill Driver | Hinged Door Adaptor | Ear Muffs |
| Bar Clamp | Vinyl Wrap Drawer | Masks |
| Cordless Impact Driver | Plated HInge-Long Thread | Disposable Gloves |
| 3mm and 5mm Drill Bit | Wood Glue | |
| Carpenters Pencil | Plate Angle Bracket | |
| Stanley 5m Tape Measure | Zinc Alloy Bugle Head | |
| Stainless Steel Combination Square | Cabothane Clear | |
| Rafter and Framing Square | Filler Plastic Wood | |
| Cordless Nail Gun | White Rags | |
| Orbital Sander | ||
| All Surface Orbital (115mm 120 Grit 8 Holes) | ||
| All Surface Orbital (125mm 80 Grit 8 Holes) | ||
| Renovator Wall Paint | ||
| Spirit Level | ||
| Hand Held Paint Stirrer | ||
| Paint Can Opener | ||
| Putty Knife |
Steps in Making Your Own Bathroom Vanity
Step 1 – Mark and Measure the Timber
The first step in making bathroom vanity is obviously to prepare the timber. Actually, all the timber panels are measured for 600 mm wide. Then, we must cut all timbers to 500 mm.
Pinch the wood to the workbench and mark it for 500 mm. In addition, use about 90-degree square to make a line the timber length.
Step 2 – Cut the Timber
Cut the timber by using the circular saw t the get right width. Make sure not to rush in smoothing the wood finish. Normally, you have to repeat 1 or 2 steps to cut the right width timber.
Step 3 – Cut a Mitre Edge
In this step to make your own bathroom vanity, you have to choose the well-looking piece of timber that you have. Don’t forget to mark it and cover the timber using a masking tape, it purposes to stop the wood to get splintered.
Then, you have to mark the straight line throughout the tape. Before you cut the timber, set the circular saw for 45-degree angle to get the right position.
Step 4 – Mark and Measure the Next Cut
Measure and mark about 1500 mm from the mitre cut by using 90-degree T-square to execute a straight line.
Step 5 – Cut the Timber
Certainly, you have to be careful in this step. Cut the timber by removing the wrap masking tape where you will cut. Make sure to re-mark about 1500 mm to prevent the wrong cutting measurement.
To cut for 45-degree angle, you have to use the circular saw. Repeat the steps to cut all others long timber pieces.
Step 6 – Mark and Size the Side Panel
To size the side panel, you have to mark 430 mm from the mitre edge. Apply the warp masking tape which covers the timber and re-mark it on the tape. The goal is to determine which parts to cut.
Step 7 – Cut the Side Panel
Then, cut the timber at 45-degree angle on the workbench using a wood clamped. Repeat the step to cut the other side of the panel to measure.
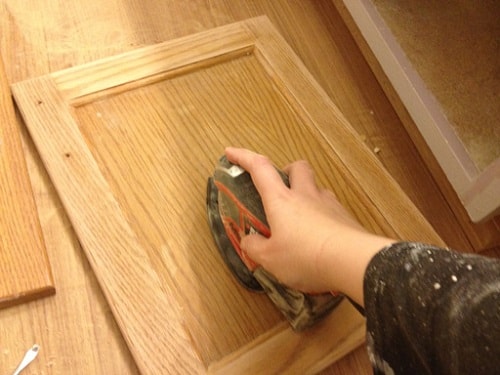
Step 8 – Sand Down the Facing Panel
This step is surely improtant to make the wood surface smoother. By sanding down the interior facing panel using 120 grit sandpaper, you can get the clean line interior surface.
But, you don’t need to sand the edges because it can create such a bad finish on your mitre joins.
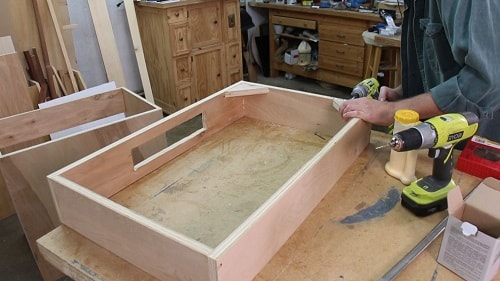
Step 9 – Install the Outer Frame
On the workbench, stand the top panel on their edge. Clamp each end to get balance while you are instaling it. Apply the PVA glue to join the mitre sides together.
Use the tape to handle the panel in a right place and apply the nail gun to connect the two pieces together. To make it look good, you should fix the nail along the side panel. Then, add about three fixing nails on the top to keep it secure. Repeat this step to connect two outer panels.
Step 10 – Connect the Outer Frame Together
To connect the frame, use the tape sides and glue to mitre joints the frame. You must absolutely fix the panel with the nail gun. Don’t forget to wipe away any excess of the glue.
(Read also: 3×5 Bathroom Rugs)
Step 11 – Install the Drawers
To assemble the drawer, you can follow the instructions on its package. Then, giving an extra strength by gluing the corners is recommended.
Step 12 – Mark and Measure for Drawers
Size the drawer width including the sliders to transfer the measurements to the right and left side. The bottom panel of the outer frame should be measured correctly.
Step 13 – Size the Divider
Size the length and height for the vanity divider. When you are measuring the length, ensure the back panel can be attached to the vanity. Remove the metering to the timber.
Step 14 – Cut the Dividers
Pinch the timber to the workbench. You can also use the circular saw to cut the divider. Make sure to repeat this step to finish the other dividers. To get the surface smooth, sand it using 180 grit sandpaper.
Step 15 – Install the Divider
To install the divider, you have to stick the divider to the bottom panel by using a bead of glue. Mark where the divider will be stuck with the glue. Install the divider in the right place.
Then, the bottom panel is facing upwards by turning the vanity position. Its goal is to make you easy in fixing the nail gun. To get the gorgeous look, don’t use too many nails on the top of the vanity.
Step 16 – Secure the Divider Using the Brackets
Attach the brackets on the side of the drawer opening and underside the top to ensure the divider is totally fixed. Making to space the brackets. Mark where the screw will be drilled using a 3 mm drill bit. Then, screw the brackets into the place evenly.
Mark where the screw will be drilled using a 3 mm drill bit. Then, screw the brackets into the place evenly.
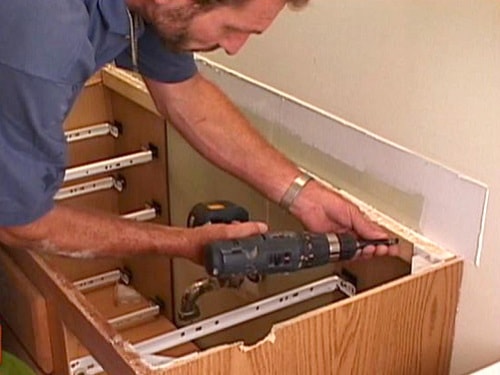
Step 17 – Enclose the Drawer Sliders
Put the sliders where you have to drill. To get the best result to make your own bathroom vanity, you may also follow the instruction on the package. Then, screw the sliders after pre-drilling the holes into the right place using 16 mm screws.
Step 18 – Mark and Measure for Making the Back Panel
Take on the length and the height metering from the back of vanity. Move those meterings into a piece of timber.
Step 19 – Cut the Back Panel
Pinch the timber to the workbench. Then, cut the back panel measurement by using the circular saw. To get the smooth edge, sand it down with 180 grit sandpaper.
Step 20 – Attach the Back Panel
Make a line over the bottom and the top of the vanity where the panel will be stuck. Make sure to set the nails in a straight line. To get the better strength, you can also apply the glue on the back panel.
Then, use the nail gun to put on the back panel at the bottom, top and the sides of vanity. Don’t forget to remove the excess of the glue by wiping it using a wet cloth. Leave the back panel dry.
Step 21 – Mark and Size for the Front of the Drawers
Size to the outside of the drawer divider from the outer side of the end panel. Leave the spacious room for the drawer to run well even it gets wet. Turn the measurements into the timber. Ensure the grains drawer works well along the drawer width.
Step 22 – Cut the Front of the Drawers Out
Cut two fronts for the drawers with a circular saw after you pinch the timber to the workbench.
Step 23 – Enclose the Front of the Drawers
Put the timber front to the drawer, make sure the edge and divider are flush. Pre-drill four holes and two on each side with a 5 mm drill bit. To attach the timber to the drawer, you can also use 16 mm screws. Repeat the steps for other drawers.
Step 24 – Caulk Up Any Gaps and Holes
To caulk the vanity, it is better to use a good wood putty to make any gaps and holes. Leave it dry, then, sand it down using 180 grit sandpaper to get the surface look smooth.
Step 25 – Varnish the Vanity
To get the natural look on the cabinet, you absolutely have to varnish the vanity surface. To have a perfect finish, you must use a high-quality brush. Leave the varnish and sand down using 240 grit sandpaper.
Step 27 – Pre-Drill the Holes on the Bathroom Wall
Choose the spot in your bathroom space to install the vanity. Pre-drill the holes in the bathroom wall or tiles with the 5 mm drill bit. Furthermore, you can drill any holes for installing the electrical cords and plumbing.
Step 28 – Check the Vanity Level
In this step to make your own bathroom vanity, you may need a someone to help in installing the vanity to the wall. Check the vanity level to prevent the wrong position.
Step 29 – Screw the Vanity
If you have found the right position, it is time to screw the vanity using 100 mm bugle screws.
Step 30 – The Vanity is Ready to Use
Yep!!! Your own bathroom vanity is ready to use. You have a gorgeous looking bathroom vanity that totally adds a gorgeous touch to your bathroom.
(You may also like: Bathroom Designs)
As a result, to make your own bathroom vanity is not a really hard thing to do. Well, it also gives you a time to explore your skill in constructing the vanity as adorable as possible. Make sure to make your own bathroom vanity that suits your bathroom space layout.
It extremely needs to get a fitting space in assembling the vanity. Of course, a matching vanity in the bathroom will enhance your space to look way more impressive as well.