Having an old light fixture in the house really makes the homeowner tedious. Moreover, if the old one exists in your bathroom, it extremely such a big problem. You can’t let that old light fixture stays and gives an ugly gloomy illumination to a room.
The bathroom should have an enough light to make it look and feel inviting. Certainly, the charming illumination is delivered by great bright light that you get from a new one. In fact, the old light sooner or later will contribute dreary and glum light. That makes the homeowners getting lazy to bathe.
(You May Also Like 10 Inviting and Catchy Unlacquered Brass Bathroom Faucet Ideas)
Replacing the old fixture is not a hard job for you. Just preparing the tools you need and getting some references, then you can work it by yourself. Furthermore, it also needed if you find your bathroom lights off. Of course, whether you want it or not, you have to replace it immediately.
Unfortunately, many people do not want to bother replacing the light by themselves, but it’s actually a fun job to replace the old light by do-it-youself ways. To help you easier in getting reference and doing it well, here we share you the steps to replace the bathroom light fixture below. Let’s see how it works!
DIY: Replacing Bathroom Light Fixture
First thing first, you have to know the weight on the wall or ceiling before you replace the current light fixture.
The Tools You’ll Need
- A screwdriver
- A voltage detector
- A combination stripper
- LED light Bulbs
- Wire Nuts
- Wire Cutter
The Step in Replacing Bathroom Light Fixtures
Step 1 – Before we get started to replace the light fixtures, you must turn the light off at the circuit breaker.
Step 2 – Then, remove the old sconces after turning off the electricity. In this case, you must remove the bulb then unscrewing the sconces.
Step 3 – After that, remove the mounting nuts that handle the light in a right place. To remove it easier, use a utility or sharp knife to obtain around the light. When you scratch the paint around the light, prevent the paint by pulling off the nuts. It is so simple to pull the light off the wall.
Step 4 – Next, use a voltage detector to check the electricity. Then, on the junction box, unscrew the mounting bracket, and pull the mounting bracket out. In this point, you actually have to be careful to note the wire. However, the white is neutral wire and the black is electrical power that are coming into the junction box.
Step 5 – Unwire the black hot wire continued by the white neutral wire. Now, you totally can remove the entire bathroom light fixture.
Step 6 – Now, add the mounting bracket to the junction box. Make sure that you notice the right positions on the light fixture in which the bolts are going to be.
Step 7 – Straighten up and down, so, one at the bottom and one at the top. It means that you must mount the mounting bracket with the same orientation. In this case, we have the little mounting screws that to be mounted vertically.
Step 8 – Next step, line up the mounting bracket with the holes that are in the juction box. Take two screws that come with light fixture. Then, mount the first screw in a right place and the second one through the bracket into the junction box. You can strengthen the screws with a screwdriver.
Step 9 – After that, tighen the nut in the center of mounting bracket. The goal is to keep the mounting bracket entirely vertical. Make sure the screws are long enough to go through the portion of the light. If the screws are too long, you can cut them with combination strippers.
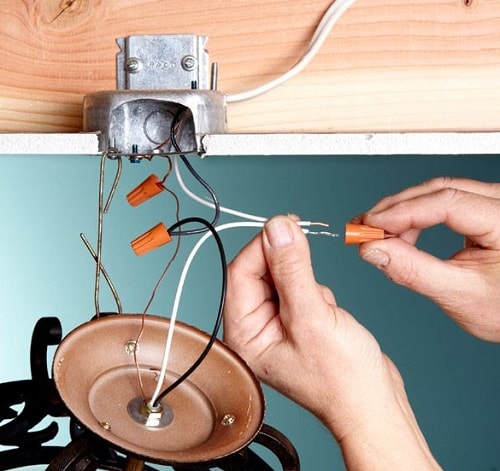
Step 9 – Now, we are going to wire the light. By adding the ground wire from the light to the green ground screw on the mounting bracket. Then, wire the two neutral wires together. You have to quite tighten the wire nut. Finally, wire the two hotwires together with the second wire nut.
Step 10 – Push the wires to the back of the junction box. Then, position the light on the two screws that you are sticking out of the bracket. Eventually, add the nuts that keep the light in a correct place.
Step 11 – Attach the nut back to the wall. Slide the sconce up onto the light and use the provided nuts to secure the scone to the light.
That is how you can change your old bathroom light fixture with a new brighter light one. It is so simple way, right?
To give you easier to do the replacing bathroom light fixture project, here is a tutorial video that probably help you.