When it comes to a small bathroom, storage is the main part of the decor that you need to optimize. You have to be able to provide enough storage to store your bathroom stuff from toothbrushes to towels. Without proper storage stations, your bathroom will look so messy – even disgusting – especially when you have the one with limited space.
Some chich storages don’t only work to keep your bathroom stuff neat and clean, but also can give another attractive touch to the overall look of the decor. So, keep in mind to choose the one that can do both jobs very well.
Creating your own bathroom storage is definitely a good idea since you can have the one which is more distinctive than those which are offered in the market. Plus, you can also save a lot since you can use cheap materials or recycle some stuff that you no longer use.
(Read also: DIY Kitchen Pegboard Storage Tutorial | Cheap and Simple DIY Project)
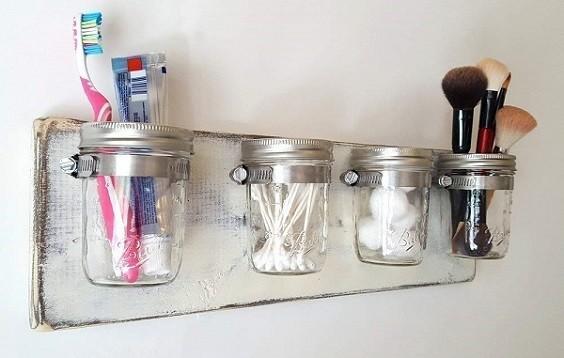
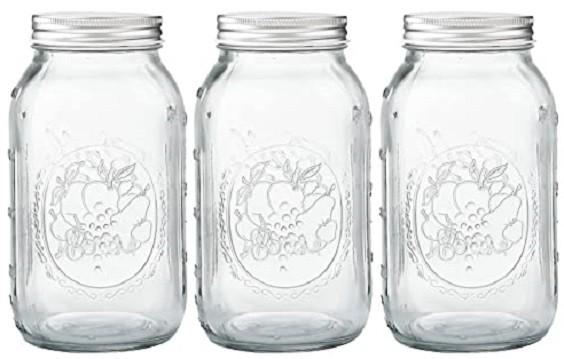
Here, we will share with you a tutorial on how to make a bathroom mason jar storage. As the name implies, the glass mason jar is the main material that we’re going to use.
Just keep scrolling to find out more!
DIY Bathroom Mason Jar Storage Tutorial
This super easy DIY project can be finished in only around 30 minutes! Since it involves some sharp tools, you need to be careful though. Wear some safety gear like rubber gloves and eye goggles if necessary.
Prepare these materials:
- Wood plank, the length, and width depending on the space that you have and the numbers of jars that you need
- Wood finish
- Glass mason jars, again, the size depends on your need
- Hose clamps
- Screws
- Picture hangers
Prepare these tools:
- Drill
- Drill bit
- Hammer
- Tape measure
Follow these steps:

- Before we get right to the main steps of the project, you need to stain the wood with your desired finish. Leave the wood overnight to ensure that it’s completely dry. When the wood is read, then you can jump right in to assemble your storage.
- Hammer the picture hangers on the backside of the wood securely, you need to use two hangers that will work to hang the storage. Make sure that the distance creates a strong force to hold everything in place.
- Now, flip the wood around. Mark the spot in which you will attach each jar. Use the pencil to mark the spot and tape measure to determine the distance between the jars.
- Drill pilot holes hole on each mark that you have created by using a cordless drill. Be careful in executing this step, it takes some elbow grease and involves a sharp tool.
- Screw each hose clamp to the pilot hole. Make sure that it’s attached in place securely.
- Slide the glass jar through the hose clamp and tighten it until you are sure enough that the jar is perfectly snugged.
Your bathroom mason jar storage is ready to use!