Setting the vanity mirror with lights by yourself is really a great way for you. Besides you can choose the tools you desire, of course, you can reduce the price in setting it. Sometimes, you are getting lazy to do that because of many factors. Even though, it becomes an advantage for you to try something. By doing it, you can filter in buying some affordable tools with low cost. Perhaps, you can make it with the tools and components to adjust with your bedroom decoration.
Many people suppose that it is a hard job to do and spend a lot of costs. In fact, there are several guides that show you to choose the low cost in setting it. As we will show you about the steps in setting the cheap vanity mirror with lights under $100 that you can do by yourself at home.
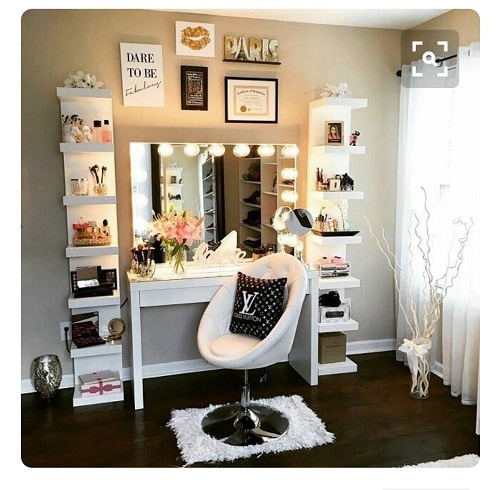
DIY Vanity Mirror with Lights for Bedroom Under $100
If you are interested in making the diy vanity mirror with light for bedroom by yourself, please pay the attention to watch a tutorial video from Simply Sandra for detail. Do not forget to make it at home after watching and reading our article here.
The Tools You’ll Need
- Vanity Mirror
- Actual light (for light bathroom)
- Extension Cord
- Light Bulbs (60 watts)
- Wires
The Steps to Set Vanity Mirror Lights
Step 1
The first step that you have to do is, measure the tabletop that you are to be placing your mirror on the top. The, take some type of scissors to cut the PVC tile edging. It is better for you to get a better look. Cut those into 30″long strips obviously because we use the mirror with 30″ long across.
Step 2
After that, we are going to place them on the top and the bottom so that the mirror is really secure. Then, you can actually screw them into the wall.
Step 3
After you have done cutting those, now, you will try to find the studs in the wall just so that your mirrors a lot more secure. And also, it is not going to actually fall out of the wall. Then, just screw them right in and then slide your mirror too.
Step 4
After that, you will take off the knobs on the actual light. Then, we just want to expose all those wires that are inside. So, you will be able to take that the white top off once you take these little knobs off.
Step 5
Then, taking a wire cutter, you will have to cut off that the top of the extension cord. Split it down in the middle a little bit just so that you can wire both of sides of that extension cord to the wires on the actual light.
Step 6
Again, with some wire cutters, we are going to expose a little bit of that wire from the plastic. So, you are just going to take maybe about one inch of the plastic off so that you can wire that the extension cord with the actual wire from the light.
Step 7
After the extension cord is going to have two sides. For one is going to be really smooth and the other one’s going to be kind of more rigid. Then, take the smooth side with the black cord on the light.
Step 8
Now, you have to take the orange cone to avoid fire hazard, twist it onto both of those wires. Then, taking the rigid side of that extension cord and placing that with the wire cord from the light.
Step 9
You are going to be twisting them together and again putting that little orange cone right on the top. Make sure that the orange cone really secure on there.
Step 10
Now, it is time to be screwing in the actual light to the wall. It is not necessary to find the stud because the light is not that heavy. But, if you feel safe for doing that first and definitely.
Step 11
Now, you’re just going to place the white cover back into the light. Put on those little caps onto each light and apply the light bulbs on. Then, take the light bulbs and screw them right in.
Ok.. Here we go!!! the final look of the vanity mirror with lights for your bedroom. It looks so excellent and the best part of it that you can get it under $100. It is absolutely amazing for getting the impressive vanity mirror with lights.