Decorating your rooms during the Halloween days is definitely a fun thing to do. you can change your ordinary yard, porch, dining room, or living room into something more terrifying.
Beside those Jack O’ Lantern and ghost-like themed stuff, something with Mummy lookA�is surely worth to include to your Halloween decor. It will enhance the spookiness of your decor perfectly.
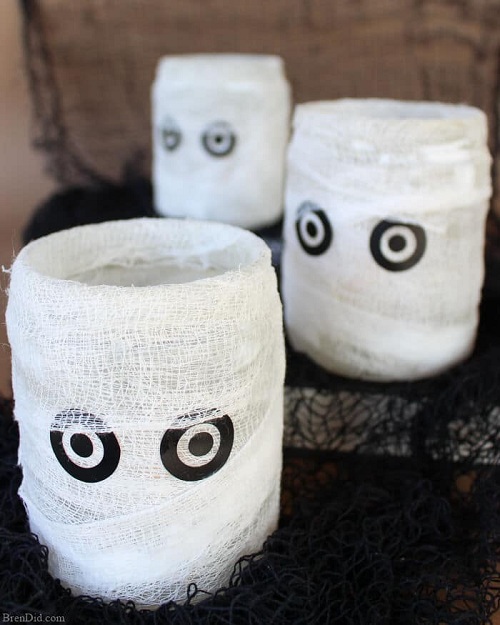
So here, we have a cute and creepy DIY stuff that will make your Halloween decor look more eye-catchy. It is the mummy luminary made of some used jars that are wrapped by the cheesecloth!
The project is very simple and easy to make, and you also will not have to spend lots of money. Recycle those glass jars that are not used anymore and with a small touch, you can already have your DIY mummy luminary all set!
This luminary will become a nice illuminating decor that you can put in your dining room, porch, or covered patio. It looks adorable, cute, and spooky at the same time!
The tempting DIY project is originallyA�created by Bren from brendid.com and below is the complete tutorial that you can follow!
(Check this out:A�DIY Drippy Candles Tutorial)
DIY Mummy Luminary Tutorial
Things that you’ll need to prepare:
- Small glass jars
- White glass paint
- Cheesecloth
- Black vinyl
- Mod podge
- 1-inch foam brush
- Battery-operated tealight
Steps that you’ll need to do:A�
- Clean the jars and remove all the printed label by label removers like Goo Gone or nail polish.
- Paint the inside of the jar roughly to give a scattered texture.
- Cover the outside of the jar with the modA�podge.
- Cut the cheesecloth into 2 x 12 inches to cover the jar
- Cover the jar in the crisscross way to make it look more mummy)
- Wrap the cloth on the top and the bottom of the jar, don’t let the line of the jar uncovered.
- Now draw the eyes by making one circle for the eyeballs and eyelids, draw a nose and a mouth if you want to.
- Let the modA�podge dry.
- Insert the battery-operated tealight and use it to lighten the room.
(Recommended for you:A�DIY Pumpkin Wreath Tutorial)
Now you have your DIY mummy luminary all set and ready to lighten up your dining room. The total cost of the project may only cost you for about $3.
Pottery Barn also sells the similar kind of mummy luminary for $24, so you can save lots of money when you choose the project than buying the fabricated one. The steps are very easy and simple to make too, you will not need any artistic skill to execute this project!
(Read also:A�DIY Pumpkin Jars Tutorial)
Put this DIY mummy luminary on your dining table among your Halloween decor. It will become a very adorable complement during the dining time in your Halloween night. During the day, this luminary will also make your side table look so Halloween!
Have fun to do your DIY mummy luminary project and happy Halloween day!


