What’s more exhilarating than having your outdoor living space decorated spookily and attractively during the Halloween week? For sure, you can’t let your front or backyard look like a quite empty space when all the neighbors haveA�theirs creatively decorated.
When you are looking for a unique stuff for this Halloween decor to hang on your porch or covered patio that you can make easily and cheaply at home, this DIY hanging witch hats is definitely worth to try. It looks beautifully spooky to make your home more attractive in the Halloween night.
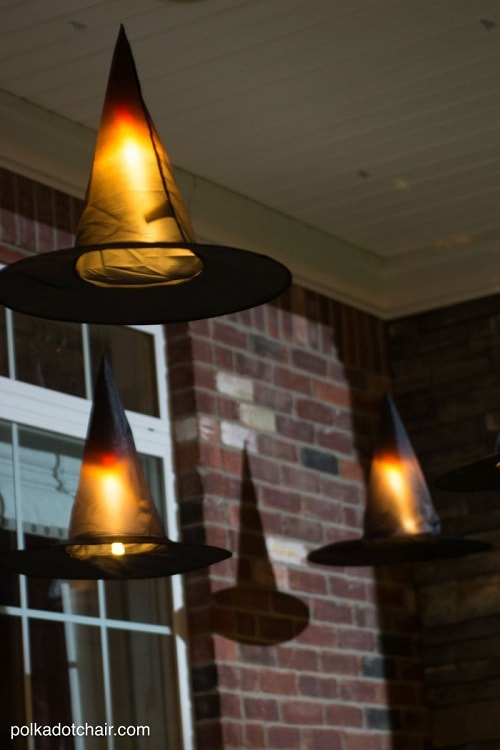
This project is originally created by Melissa from polkadotchair.com that is very easy and simple to try without any needs of special skill. The cost to get this DIT hanging witch hats is also reasonably cheap, so you don’t need to spend lots of bucks.
You will need some witch hats obviously, light sticks, command hooks, fishing lines, and safety pins for this project. With a few sewing and hanging steps, you can get this thing done in no time!
(Check this out:A�DIY Witches Brooms Tutorial)
Well, let’s just keep scrolling to check out the complete tutorial of this DIY hanging witch hats project!
DIY Hanging Witch Hats Tutorial
Things that you’ll need to prepare:
- Witch hatsA�($4.49)
- Light sticks (the lightweight one and with hanger) ($7.99)
- Safety pins ($2.15)
- Command hooksA�($6.21)
- Fish lines ($4.61)
- Needle
Steps that you’ll need to do:A�
- Determine in which part of the ceiling where you will hang the hats then attach the command hooks on each spot as you desired. Let them set for about 15 minutes.
- Cut the fish lines for about 2 to 3 feet then string onto the needle then feed it to the point of the hat from the outside.
- Pull the string through the inside of the hat, and leave some inches on the outside of the had that will act as the hanger.
- Then, take out the needle and secure the fish line around the safety pins.
- Attach the light stick to the safety pin. It is important for you to choose the lightweight light sticks because it shouldn’t weigh down the hats.
- Tie the end of the fishingA�line and now you can hang your hats on the command hooks.
(You may also like:A�DIY Pumpkin Wreath Tutorial)
So those are the steps that you’ll need to make this DIY witch hats at home, it’s very easy to make, isn’t it? The cost of the project is definitely affordable rather than buying those expensive decors.
You can either repurpose the used witch hats or buy the set of six package that averagely costs for about $5.
The hats will surely look beautiful to decorate your porch, they will look great in the middle of the daylight and dazzlingly attractive in the night. For more catchy appearance, you can draw some spooky faces on the hat too! They will become a nice complement side by side with the witch brooms and Jack O’ Lantern topiary.
(Read also:A�DIY BW Pumpkin Topiary Tutorial)
Have fun to do your DIY hanging witch hats project and happy Halloween day!


