The lantern is definitely one of the most favorite things when we’re talking about the Halloween decor. Whether it’s hung on your porch or put on the side table, the lantern is always an interesting to decorate your home this last October.
With hundreds of various lantern styles that you can find nowadays, you must be looking for the unique one to include to your Halloween decor, and here we share you a very spooky and creepy lantern that will freak your friends off. You can create the lantern by your own with some very little efforts and budget.
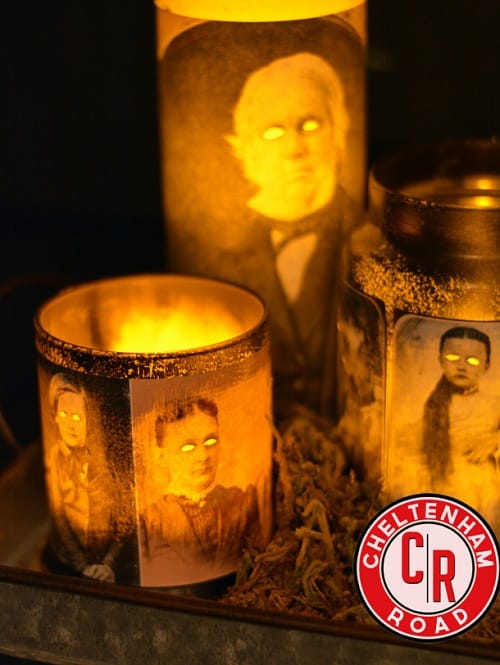
The DIYA�Spooky Glowing Eyes Lantern that is originally created by Cheltenham Road from cheltenhamroad.wordpress.com. It’s a very fun project that is totally worth to try this Halloween.
You’ll need to google some spooky old Victorian photograph, glass candle holders or mason jars, mod podge, black spray paint, and rag, and battery-operated tealight to create this creepy lantern. The steps are very easy and simple, you don’t need to have the particular skill to get the project done.
So below is the complete tutorial of the DIY Spooky Glowing Eyes Lantern!
(You may also like:A�DIY Pumpkin Wreath Tutorial)
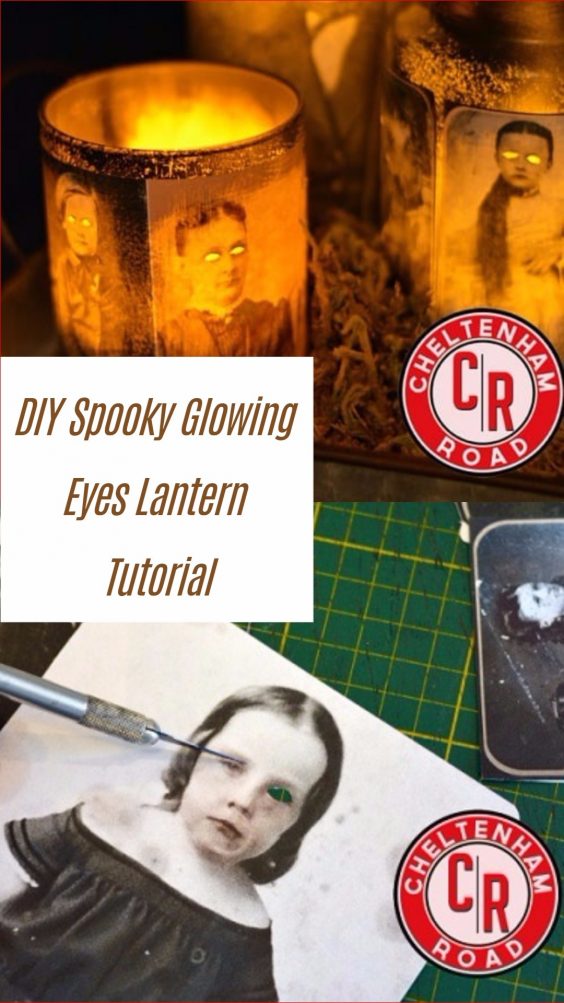
DIY Spooky Glowing Eyes Lantern Tutorial

Things that you’ll need to prepare:
- Glass candle holders or mason jars in various sizes
- Victorian photographs
- Mod podge
- Black spray paint
- Textured rag
- Sandpaper
- Foam brush
- Sharp craft knife
Texturing the jars:A�
- Spray paint the top and the bottom of the jar, let the paint cover the middle part of the jar roughly.
- While the paint is still wet, wrap and press the jar with the rug to create the rough texture, so the more textured the rag you use, the better texture will appear. Remove the rag and see whether you have made kind of ‘creepy’ texture or not.
- Let the paint dry then scrapA�the paint to create a more rough texture and make the picture look clearer.
Modifying the photographs:A�
- Remove the whole eyes of each photograph that you have chosen by using the craft knife. You have to create a wide whole to make sure that the look of the face is extremely spooky.
(Recommended for you:A�DIY Ghost Candy Holder Tutorial)
Applying the photographs to the jars:
- Stick the photograph onto the jar by using the modA�podge. Let it dry.
- When everything has dried, seal coat the photograph, make sure that you use the matte modA�podge.
There you have your own DIYA�Spooky Glowing Eyes Lantern to complement your Halloween decor! The steps are very easy to follow, and the cost to purchase the materials are very affordable.
Place this creepy lantern next to the mummy luminary or Jack O’ Lantern jar on your side table. For sure, you will have a superbly catchy and attractive Halloween decor when they all set together.
(You will love to see this:A�DIY Creepy Eyeballs Tutorial)
Have fun to do your DIY Spooky Glowing Eyes Lantern project and happy Halloween day!


