This is the time for you to browse around the internet to find some unique Halloween decors to decorate your house, especially those which can you make easily at home. It is always a fun thing to create some adorable stuff by your own that purchasing it stores in which you can also save lots of your budget at the same time.
For sure you can find easily hundreds of tempting DIY Halloween decor projects that must inspire you to try at home, and here we share you one simple and cheap project to create a spooky stuff for this Halloween. This is the DIY ghost candle holder that is originally created by thekeeperofthecheerios.com.
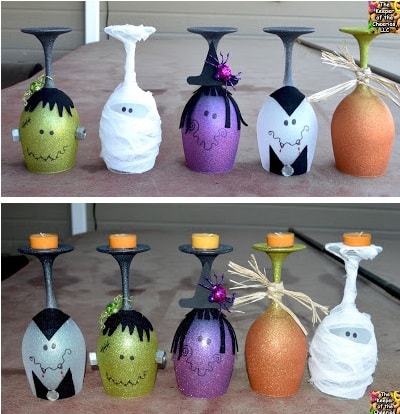
You can see how adorable and spooky they are to be part of your Halloween decor. You will basically need some wine glasses, glitter spray paint, raffia, felt, and craft foam to create those cute ghosts. The steps are very simple and easy so you don’t have to be tricky to deal with this project.
The budget of the project is also absolutely cheap and the materials are easily available. It is more fun to execute the project outdoor with some help from your family!
(Recommended for you:A�DIY BW Pumpkin Topiary Tutorial)
Well then, let’s check out the complete tutorial of this DIY ghost candle holder below!
DIY Ghost Candle Holder
Things that you’ll need to prepare:A�
- Some used wine glasses, you can use either glass or plastic
- Felt sticky black
- Craft foam
- Various sharpie markers
- Cheesecloth
- Raffia ribbon
- Hot glue
- Tealight
Steps that you’ll need to do:
- Clean the wine glasses to remove the dust or spots on its surface.
- Spray the glass with the glitter spray paint as you wish, you can choose the colors as you wish and use your imagination to create the spooky characters.
- When the paint has dried, you can start drawing the ghost’s character like Jack O’ Lantern, mummy, or Dracula as you desired. You can use the craft foam to create any interesting accents that you can stick to the glasses.
- Now put the tealight on top of the glass’ base.
(Check this out:A�DIY Creepy Eyeballs Tutorial)
BOO! You have your own DIY hanging ghosts now that will be a very catchy decor to place on your side or dining table. The steps are so simple, right? The most fun thing is that you can draw any figures that you love!
You only need to paint, draw, stick, and cut to get your hanging ghost done! Keep in mind to spray the glass from the proper distance to give the best result, and shake theA�can well so you won’t find any clogs.
This spooky decor will definitely become a great complement to place next to the spooky figurines or the Halloween pumpkin jar. For sure, such combination will create a very attractive DIY Halloween decor that will catch every single glance!
(You will love to read this:A�DIY Witches Brooms Tutorial)
Have fun to do your DIY hanging ghosts project and happy Halloween day!


